![]()
![]()
![]()
![]()
|
|
|
|
| They must have the GroupWise snapin for NWAdmin installed on the Windows workstation from which they'll be doing the administration. | |
| Their account must have the rights to create users in the container and must have rights to the container in which the post office object resides. | |
| They must have access rights to the DCCCD domain directory and must have a drive mapped to it when administering the accounts or else specify an UNC path to the domain when they first bring up the admin snapin. |
Prior to running the GroupWise snapin you must have access to the DCCCD domain directory located at \\DSC2\SYS\DCCCD. You can specify this as the UNC path, when asked, or you may want to map a drive for permanent access. A UNC path is best in that it doesn't require a permanently mapped drive. Contact a LAN administrator at DSC to get your access. You need to be running Windows 95 or NT as your OS.
| If the snapin has been installed on your server, then all you need to do is run NWADMN32 from the Y:\WIN32 directory. The inclusion of the GroupWise snapin will be automatic. | |
| If the snapin is installed you should be prompted to enter the path to the domain directory. Enter path mentioned in the first paragraph of this section. You should only need to provide the location of the domain once unless there have been certain changes on your workstation. |
Now, when you run NetWare Administrator you should see a set of three GroupWise options under the Tools menu.
| GroupWise System Operations | |
| GroupWise View | |
| GroupWise Utilities |
You shouldn't need to use anything in GroupWise System Operations as most of them pertain to the GroupWise domain and are somewhat restricted regardless. The GroupWise View allows you to see all or part of the GroupWise system in one place, rather than one user at a time. The Utilities menu is where you run checks against user accounts and other maintenance operations. None of the above are actually used in the creation of a new user.
There are two ways to create a GroupWise user.
| Create a standard NetWare user and add the GroupWise attributes to it. | |
| The second is to use a template that is constructed to include the GroupWise attributes. |
There are some minor concerns regarding the procedure between the two methods.
We begin by creating a regular NetWare user. Keep in mind that some of the information regarding the user is copied to the GroupWise address book.
| Given Name | |
| Last Name | |
| Title | |
| Department | |
| Telephone | |
| Fax Number |
With regards to the first and last name, you need to be aware that these are the names displayed in the address book. They must not include any periods in them, as a period is used to separate the unit components of GroupWise. In essence the first and last names will need to be entered in the same form that a GroupWise user would type to send a message to that individual, as that is the form a user would see in the address book. Later this same form will need to be duplicated as a nickname. The Full Name field is not used by GroupWise so can be used to store a modified version of the name, usually their name complete with initials.
We recommend use of full ten digit numbers for new users. That is, area code and the phone number. We'd like to standardize on the format of (999) 860-9999.
The other screens not related to GroupWise, such as Environment, Rights to Files and Directories, Group Membership and the password screens will need to be filled in as usual. They have no effect on the information in GroupWise.
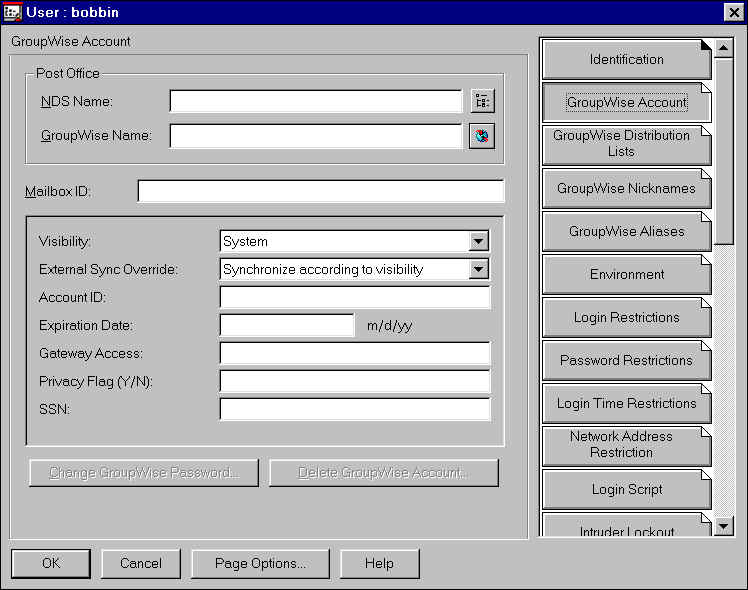
If your snapin is working properly you should see some GroupWise related tags added to the regular ones on the rightThe GroupWise tags can be found on the right side of the user input screen by scrolling down the scroll bar. There are five GroupWise related tags. We'll be concerned with only three of them.
| GroupWise Account | |
| GroupWise Distribution Lists | |
| GroupWise Nickname |
If you perform GroupWise administration frequently you may want to use the Page Options button to move the GroupWise tags closer to the top, as seen in the image below. The setting of GroupWise Aliases is reserved for District administrators due to possible conflicts occurring.
| The easiest way to specify the post office is to click the red and blue icon opposite the field labeled GroupWise Name and select the post office from the list. This will cause the NDS Name field to be filled in and the Mailbox ID field to default to the NDS user name. Please keep these matched, especially if you change the NDS account for any reason., |
| The Account ID field is where we put the account to which this GroupWise account is to be charged. District accounting doesn't use information from this field at present so it doesn't need to be maintained unless a local use for it is found. |
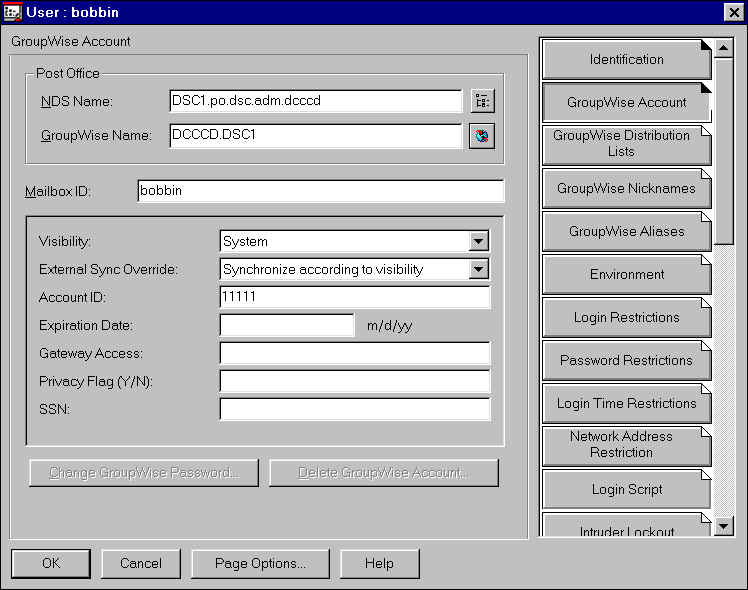
| Although it is rarely used, the Visibility field can be set to determine where the user's account can be seen. If you don't want the account to be seen by anyone select None. If you want them to be seen only in the post office to which they're assigned, select Post Office. Otherwise System allows them to be seen by all GroupWise users at all post offices. | |
| The Expiration Date field can be used to set a predetermined date on which the user's GroupWise account will no longer be available to that user. On this date he will be locked out of the account although messages will continue to go to his inbox until the account is deleted. Expired accounts can also be deleted through the GroupWise Tools options. | |
| There is another field which may not initially show up on this screen until the GroupWise attributes have been written out. This is the File ID field. This is an unchangeable three character field that is assigned when the GroupWise account is created. It's used to determine the file name of the user's database and notify files. | |
| The SSN field should also be visible (you might have to scroll down a bit) and may or may not be used at this time. We anticipate changing this to the user's Colleague number at some point. | |
| Another field, not shown in the screen above, is new to GroupWise 5.5. It's a checkbox that allows you to set whether a user can log into their account. |
At this point we still have to enter the nickname and any initial distribution list(s) (Global groups). But this is where one of the differences between creating a user from scratch and creating one using a template configured with the post office becomes important. So far only so much of the NDS information has been saved. Any of the GroupWise information is still pending until we click the OK button in the lower left corner of the user input screen. Until the GroupWise account has been written out to the domain you cannot add nicknames, distribution lists or aliases. At this time, click the OK button to save the GroupWise information.
Reselect the new user from the NDS browser, scroll down to the GroupWise Nicknames tag and select it. This is where we put the name that a GroupWise user enters to address a message to this particular user. It should look exactly like the given name / last name in combination. More than one nickname can be applied to a user. This feature can be used in order to attach a position related name to the individual or to allow for newly married women to be addressable by their old and new surnames. We recommend not using multiple nicknames unless absolutely necessary.
The need for nicknames is in question now that the GroupWise address book allows lookups by first or last name. Originally nicknames were used throughout District to avoid requiring users to remember other users' user IDs or having to go to the address book to look them up. Now that the address book can look up names, the only advantage to having nicknames is to allow those who have their address book sorted in last name first order the ability to enter a name in first/last order. However, nicknames don't participate in name completion so you would have to type in the entire first/last name in the address field if you're sorted in last/first order. It would also have to be spelled correctly.
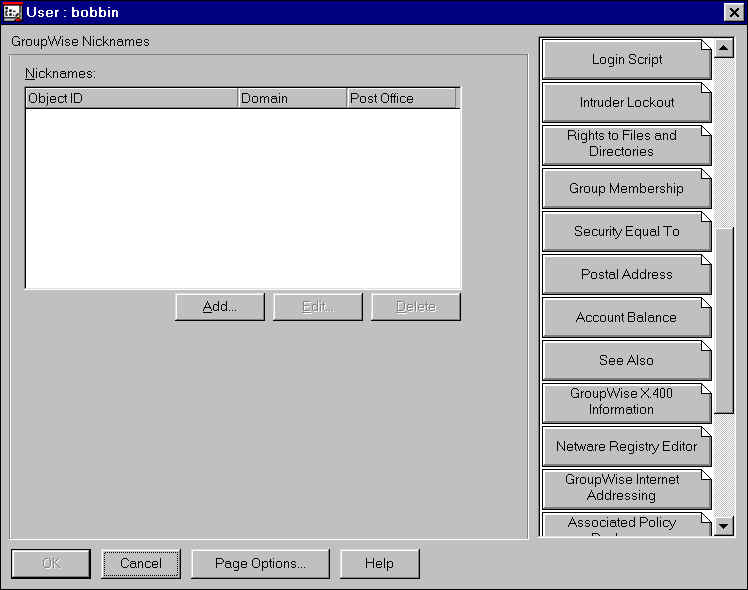
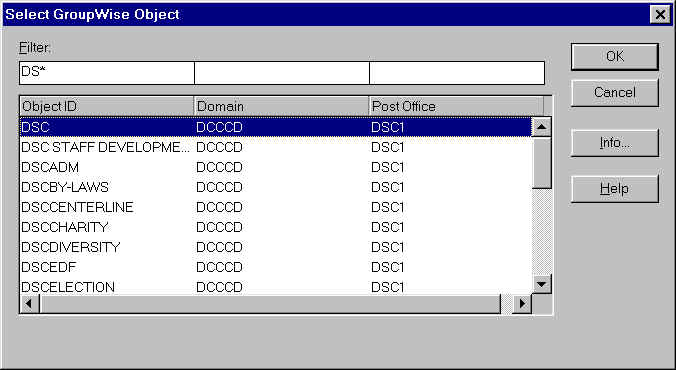
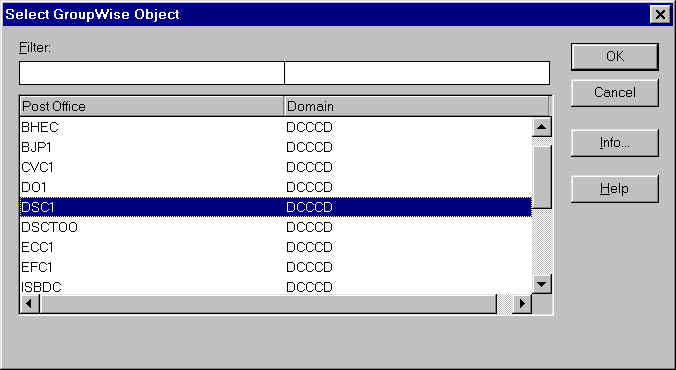
| Click the Add button. What you'll see is a screen for specifying the domain.post_office, the object ID and the visibility. Each nickname can conceptually belong to a different post office so that viewing can be limited to a post office other than the one on which the user was established. Whether this feature works or not is in doubt. Since nicknames don't show up in the address book with GroupWise 5 the visibility of a nickname is probably moot. Restricting the visiblity of a nickname may make it un-usable by users in another post office. |
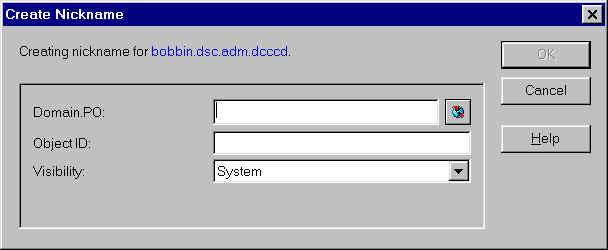
| Leave the visibility at System. |
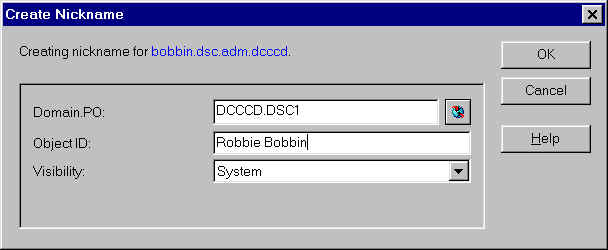
| Click the globe icon then find your post office. Select it then click OK. Enter the Object ID. This will be the user's name as it should be typed by another GroupWise user to address a messege to this user. | |
| Click OK. |
Nicknames are valid incoming Internet addresses but any spaces in the nickname must be replaced with underscores by the sender. Nicknames do not show up on outbound email messages, only the user ID or alias. Nicknames cannot have periods (dots) embedded in them for the same reason that given and last names can't. This isn't the case if the nickname is to be used only for inbound Internet addressing. Be very careful regarding possible conflicts wtih nicknames.
These are the same as global (public) groups. Each GroupWise user can be associated with a distribution list in one of two ways. The list can be added to the user or the user can be added to the list. Each campus container has an organizational unit called PO. The post office object is located in this directory as are all the local campus distribution lists. In the case of Richland there is a second OU called PO2 which contains the RLC2 and RLC3 post office objects.
The District campus mailing lists are maintained in the DSC/PO container. Since each campus administrator should only have access to writing information to objects in his own container they'll need to used the tactic of adding the list to the user unless the list is inside their container.
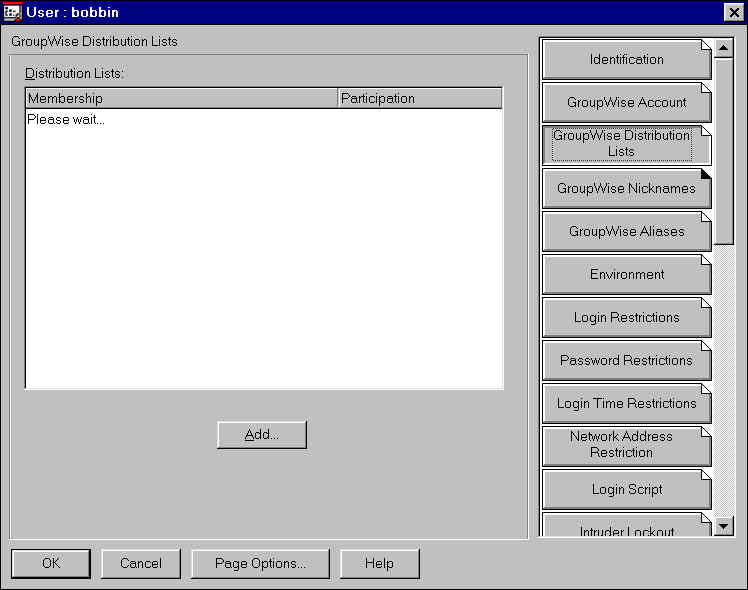
| When the GroupWise Distribution List tag is clicked, a list of the distribution lists to which the user belongs is displayed. In the case of a new user there should be none. However it may take a fair amount of time for the program to determine this so you must wait until the Add button replaces the Stop button below the list. | |
| Click the Add button and when the next screen begins to display the list of available lists, click the Stop button (or press ALT-S). Otherwise the program will try to display all available distribution lists and will eventually stop due to lack of buffer space. |
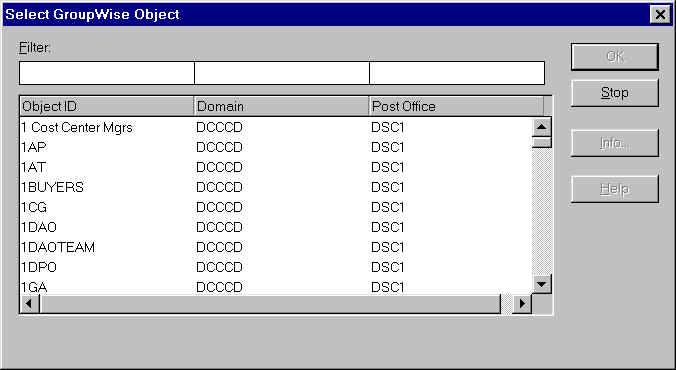
The Select GroupWise Object screen will have three filter areas at the top. They
represent the labled field below them.
| |||||||||||
| Click the OK in the lower left corner of the user input screen to write out the data. |
NWADMIN gives you the ability to design a template as a basis for the attributes of a new user. This template can include some of the GroupWise attributes in addition to the standard NetWare user properties. The template can be preset to designate a post office for the user but all other information must still be added, including a nickname and any distribution lists. Templates with GroupWise attributes have been created on all post offices. You may want to expand any others that you've created to include the GroupWise attribute. Since the post office has to be specified by name, any location with more than one post office would need a separate template for each post office.
| Setting up the user in the usual manner, supplying the user's login ID and last name. |
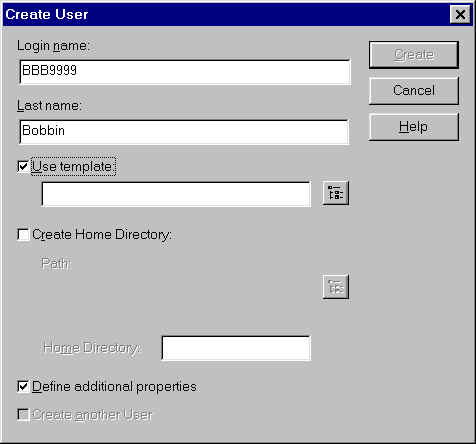
| In the Create User box click the Use Template selector to place a check mark in it. | |
| Click the associated browse button to select the template. |
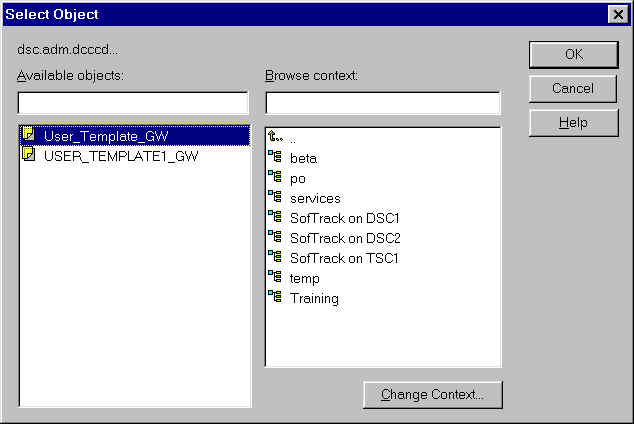
| Select the template from the list to return to the Create User box. | |
| Click the Define Additional Properties box. | |
| Click the Create button. |
Fill in the fields in the Identification page as you would if you were setting up a new user without the template. In the other tabs on the right of the window, if the template was configured with such properties as Default Server, Home Directory, Login Restrictions, etc. there should be no need to enter these.
When you go down to the GroupWise Account button you'll find that the post office is
already entered as per the template. The Account ID informtion will need to be filled in.
Because the GroupWise account information was written out when the user was created you
can go directly to entering the nickname and distribution list information. Enter these as
they are done in the instructions above.
|
Educational opportunities are offered by the Dallas County Community College District
without regard to race,
|