![]()
![]()
![]()
![]()
![]()
|
|
GroupWise 5.X Web AccessWeb Access is a system that gives a GroupWise user a new avenue to access their GroupWise email...the World Wide Web. With Web Access any Web browser conforming to the 1.1 Web specification can access your email from anywhere in the world. It makes a viable replacement for remote mail for most functions and has the advantage of being accessible in places where you may not bring your own laptop. For StartersTo use Web Access you'll need a Web Browser such as Netscape or Internet Explorer. Others will work as long as they conform to the 1.1 specifictions. You'll also need a connection to the Web, meaning a dialup connection through an Internet Service Provider (ISP) or through a company or school connection. You'll often find these connections available at conventions and seminars. Before you start to use Web Access you'll need to set a password on your GroupWise mail account. This provides security so that others can't access your email through the Web. If you already have one set for GroupWise Remote or just for security within your office you won't need to set it again. When you set your password be certain that you remember how you typed it. GroupWise is case sensitive when comparing passwords. If you entered it in upper case when you set it you must use upper case when you're prompted to enter it in Web Access. Likewise for lower case. Making the ConnectionFrom your Web browser, set the URL to http://gw5.dcccd.edu . One of two things may happen. The most likely is that you'll briefly see a screen with the text "Click here for GroupWise." This should quickly change to the GroupWise WebAccess login screen. The other possibility is that your browser isn't capable of jumping to the login screen. In this instance you'll need to click on the "Click here for GroupWise" to proceed.
The login screen will have two fields that need to be entered and three buttons. Click on the field marked "Name" and enter your GroupWise account ID. This is generally the three letter, four digit account that you use to log into the network. Click on the Password field and enter the password you set on your GroupWise email. Remember it's case sensitive. If you're using a Java enhanced browser, make sure the "Java-enhanced GroupWise WebAccess" button is marked. Click on the Login button. If the password is acceptable you'll see a screen that provides you with several GroupWise options.
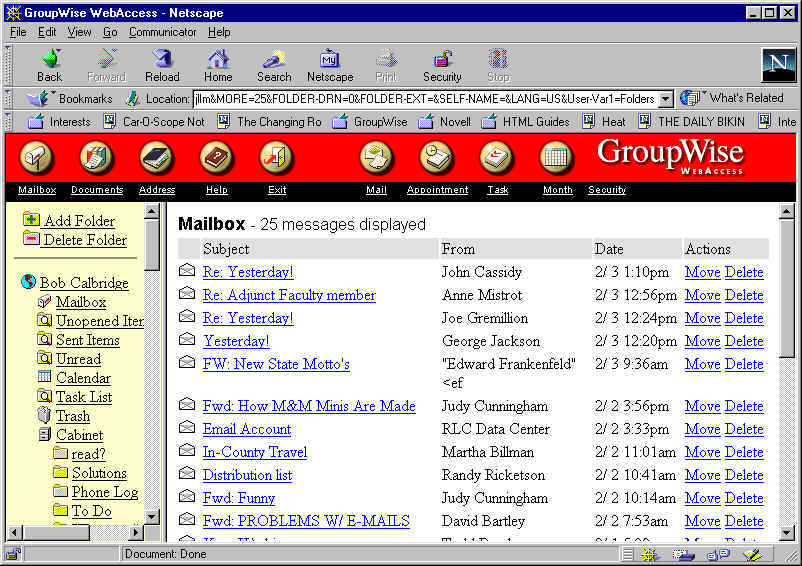
The Screen
The screen will look similar to what is above, a row of buttons for changing between functions and two frames, one with the list of your folders and the other with a list of your messages, the most recent first.
This document will not be extremely detailed regarding the operation of each of these functions as they're relatively intuitive to anyone who is familiar with GroupWise. Limitations Due to the nature of the program there are some limitations.
The Specifics
Each screen will have a row of icons at the top that let you move to other screens. The following summarizes some of the screens. At any time you want to leave Web Access you can click on the Exit icon. As a security measure, when you leave your browser unattended for a period of time, your login becomes invalid and you'll be asked to re-enter your login information.
TipsThe current timeout on Web Access is set to 30 minutes. If, when entering a message, you exceed this time limit, your session expires and you'll be required to log back in. In order not to lose the work you've done entering the message text you can use the Windows ability to copy and paste to retain the text. Simply highlight the text in your message window that you want to save and press Ctrl-C to copy it to the clipboard. Then, log back into WebAccess, re-address a new message to your recipient, place your cursor in the message area and press Ctrl-V to paste the contents of the clipboard to the message window. Now send it. If you anticipate a rather lengthy message before you get into WebAccess you might consider using some other Windows based text editor for initially creating your message before logging into WebAccess. You can then use the same copy and paste method to bring the message into WebAccess. Goto Login Screen |
|
Educational opportunities are offered by the Dallas County Community College District
without regard to race,
|